Table of Contents
Lighter & Stronger Oar Shaft
It is more by accident than design I have arrived at an efficient and radical way of making a stiff, light shaft. The cross sectional shape goes by the rather awkward name of “isosceles trapezoid” (an isosceles triangle with the apex cut off). It was while I was playing around with different shapes that I was surprised to find that such a shape could rotate in the oarlock, as well as provide a flat section to match the D-shape oarlock. Since it had many other advantages I have been making oars using this shape.
Considerations for oarlocks:
Most oarlocks are designed for a round less than two-inch diameter shaft. When the leather protector is added, the shaft is reduced to 1 7/8”. Some fittings reduce it to 1 ¾” at the oarlock and this dictates the dimensions of the rest of the oar for a given length. Most properly designed oars will have approximately the same volume. Hence they need a light strong timber.
Expensive and hard to get, Sitka Spruce, is generally selected as the ideal choice.
Active and passive planes:
the plane of the oar vertical to the water (passive plane) only needs to be strong enough to lift the blade in and out of the water, while that parallel to the water (active plane) needs to be strong and stiff to resist bending and breakage of the oar. The passive plane of a round oar is wastefully stiff. There is no reason why a heavier timber cannot be made thinner in the passive plane as long as it is still functional.
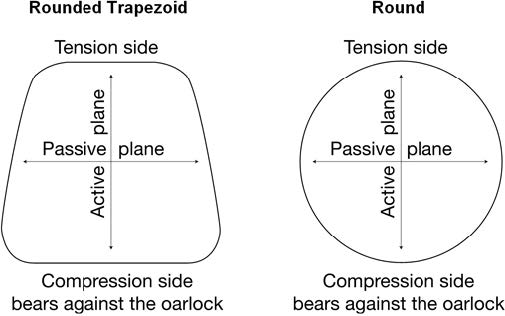
Note that the trapezoid cross section has substantial material on the tension side and even more on the compression side to compensate for the lesser compressive strength of wood. By contrast the round cross section has a minimum amount of material where it is most needed and a maximum where it is least needed.
Stiffness:
It takes energy to bend an oar and this energy will be imperfectly returned at the end of the stroke when it is not as useful.
I may have an argument on my hands about this as one enthusiast has told me; “The oars on my Adirondack guide boat have quite a bit of spring in them. The builder says that’s intentional.” In order to resolve these contrary positions, the argument should be taken to a logical conclusion. So: Consider an oar made of stiff rubber that bends considerably. It is obvious that it would be quite ineffective. Now make it of stiffer and stiffer materials. It will become progressively more effective. The logical conclusion is that a perfectly stiff oar will be most effective.
A 10% increase in thickness of the active plane will yield a 20% increase in stiffness. Both the amount of material, and, the distance between the compression and tension side of the active plane affect stiffness. This explains the two to one ratio. Only the amount of material in the passive plane affects stiffness, so, its thickness affects stiffness on a one to one basis. This means that a 1/8” increase in the active plane will allow a ¼” decrease in the passive plane, producing a lighter oar that is just as stiff.
Balance:
The oar should be as light as possible especially at the outboard end. Energy can be wasted in the following ways due to poor balance:
- For each stroke the oar reverses direction twice. Since the speed of motion at the blade end is greatest, then its weight will require the greatest effort to reverse direction (it will also slow the boat as the rower is effectively pushing back on the oarlock). The weight of the handle has less effect, as its speed is one third of the blade.
- For each stroke the oar must be raised in and out of the water. The more balanced the oar is over the oarlock and the lighter it is, the less effort will be required to overcome inertia and weight. Extra weight in the handle helps balance the oar, but increases inertia. A sufficiently light oar will almost balance with the weight of the hand and arm holding it.
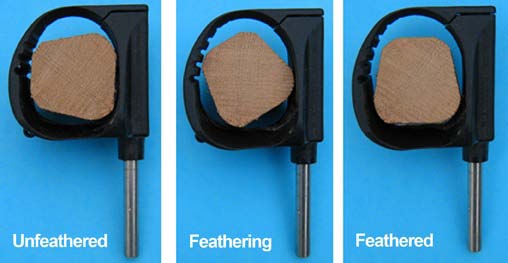
It is remarkable how much easier it is to feather a lighter oar, probably because of its lower inertia, and, friction at the oarlock. After all, the wrist twisting muscles are much weaker than the major muscles used in rowing.
Utility of an Oarlock:
Oarlocks made for racing sculls are designed for the utmost efficiency. They have a plastic oar holding body on a stainless pin (the Gaco is modeled on this principal) for low friction. The shaft at the oarlock employs a D-shape fitting to marry to the D-shape of the racing oarlock. This has the important function of holding the oar blade vertical to the water with little effort from the rower. The D-shape also makes for a stronger and stiffer oar. Most recreational oars and oarlocks do not have this feature.
An old catalog from Wilcox Crittendon (pp76-81 of “Boats Oars and Rowing” by R.D. Culler) shows 26 kinds of oarlocks and yet only one, called Victoria pattern is designed to accommodate a D-shape
cross section oar. However I am old enough to remember hire boats, when most fishing was done from row boats, which had bronze D-shape oarlocks on steel posts and I still have an oar made in the fifties which has a flat section on the back, a kind of modified D-section.
All is not lost as the Douglas oarlock and the Gaco are designed to accommodate the D-shape oar. The Gaco has a plastic oar holding body that is easy on the oar especially if it is protected at the oarlock with fiberglass (which also improves stiffness and strength).
Oar design
Racing oars these days are made of round carbon fiber, tapered hollow shafts with a meat cleaver carbon fibre sandwich blade (shaped somewhat like a meat cleaver and angled to parallel in the water on the rowing stroke). They can be ugly especially at the bolt on D-section adapter to the oarlock, and the black carbon fibre does not appeal. For reasons of simplicity, availability, cost and aesthetics, the shaft is best made of timber and the blade carbon fibre. A carbon fiber blade allows for the efficient complex shape needed. The shaft can be varnished and the blade painted white, thus retaining traditional aesthetics.
Characteristics of timber:
The following facts about wood characteristics are taken into consideration in the design:
- Tension strength along the grain is approximately twice compressive strength.
- There is a reasonable correlation between density and strength.
- Strength across the grain is only about 4% of the strength along to the grain.
Length of oar:
This should be 1.9 times the distance between the oarlocks. The inboard part of the oar should be 26% of the length of the oar.
Cross section:
The following cross sectional shapes have been considered.
- Round: for strength this is close to the worst shape. It is thinnest at top and bottom where it needs maximum compressive and tensile strength. In the neutral middle where very little strength is needed it is thickest. Good shape for flag poles but not much else.
- Oval: Better than round but confined to a round shape at the oarlock, and has similar negative characteristics as round.
- Hollow: Difficult to make and inclined to fail. I well remember the hollow Oregon and Spruce spas failing on other skiffs while us poorer kids with the solid Oregon masts and steel (not duralumin) centreboards went on and on, part way down the pack of course, without any problems.
- Isosceles Trapezoid with rounded edges: by a process of deduction and trial and error I have selected this shape for the following reasons.
- It allows design to accommodate the difference in tensile and compressive strength. The weaker compression side is wider than the tension side.
- There is more width and strength at the top and bottom of the active plane where it is needed.
- It facilitates feathering.
- The flat section on the wider compressive side behaves like a D-section oar and holds the blade in the correct vertical position with little effort from the rower.
- The thickness of the oar in the passive plane can be reduced to cut weight.
- It is easy to cut with a circular saw with very little waste.
- It employs as a starting blank the very common four by two.
- For a given weight it is stronger and stiffer.
Timbers:
Number one clear Douglas Fir (Also called Oregon) seems readily available in recycled timber yards but elsewhere is rubbish and full of knots. I have also, with a bit of luck, been able to secure a reasonable quantity of Western Red Cedar at the same yard. Not only is this timber often of good quality, it is generally cut to a very generous 4” by 2” so that its dressed size can be 4” by 2”. Is it not a wonderful thing to save forests by using timber that has possibly served structurally for perhaps 50 years and turn it into something beautiful and functional?
I purchased Sitka Spruce, rare in Australia, which had been imported to renovate a Tiger Moth. Surian a type of cedar was available at a local exotic timber yard.
Some guide to their use is given below. The figure in brackets is the density relative to water. Bear in mind that these are only timbers I have used and there must be numerous others. It is reasonably easy to research timber properties on the Internet these days if in doubt.
- Oregon (0.55 but varies): Cheapest and most readily available but must be carefully selected to avoid knots. A bit on the heavy side but made reasonable in weight by keeping the passive side slender. I might add that a slender passive side makes the pair of oars wonderfully easy to carry with one hand. Planing and routing must be done with the grain to avoid slivers of timber shattering off (the rotary action of a power plane tends to minimize this problem). The grain looks attractive when varnished.
- Sitka Spruce (0.45): Most expensive and difficult to acquire. It is light and easy to work. Finishes to a beautiful cream colour when varnished.
- Surian (0.41): Reasonably expensive but fairly available. It is light and easy to work but soft. Finishes to a beautiful red colour.
- Western Red Cedar (0.35): lightest, must work with the grain to avoid splintering. It is quite pretty with a nice grain when varnished. This is my timber of choice for the shaft as it is available, very light and modestly priced.
Making the shaft from 4”x 2” timber.
The passive plane of the shaft shaft must be tapered towards the blade to take into account the diminishing stress, which is at a maximum at the oarlock. The dimensions for cutting take this into account as well as allowing for width of cut and planing. The cutting can be achieved with three passes of the hand held circular saw.
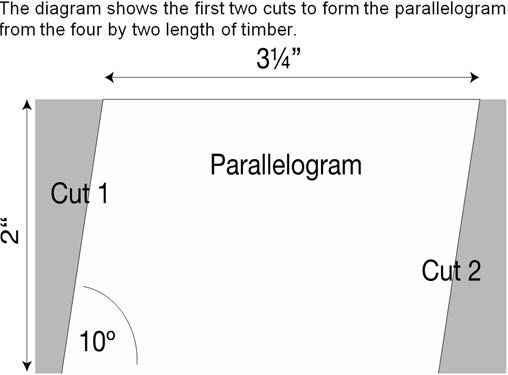
- The four by two is first cut to a length one foot (30 cm.) less than the overall length of the oar. The remaining foot will be made up from the blade.
- The circular saw blade is set to an angle of 10 degrees and the timber is cut down each side (aided by the saw guide) to a parallelogram shape whose major dimension is 3 1/4” (80mm). Leave the saw set to the same angle for the third cut.
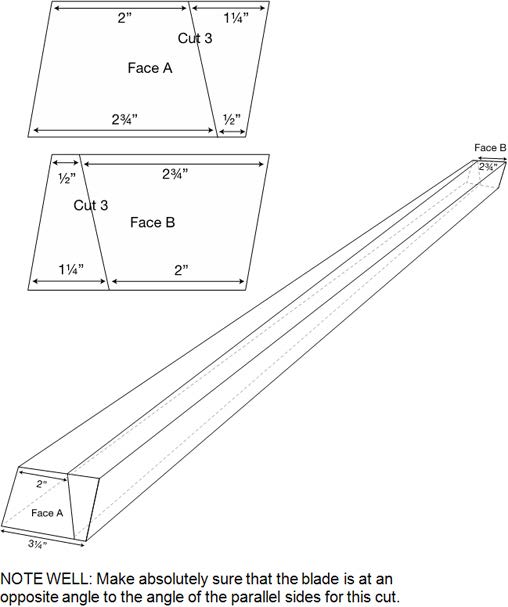
- Carefully mark the longitudinal cut by stretching masking tape along the timber. Use the dimensions shown in the diagram. This cut is easier to make with a hand held circular saw than a table saw. (Note:For long oars it is possible to increase the dimension by cutting a larger parallelogram and altering the dimensions somewhat. However the dimensions given are more than adequate for oars up to 8 feet long.)
- Plane the resulting blanks to equal size and weight. After checking stiffness you may elect to trim the passive side to suit yourself. The only stipulation is they must be able to rotate in the oarlock and of course not be too flexible or weak.
- Taper the front of the shaft from 8” (20cm.) from the tip to zero where it is going to attach to the blade
- Rounding the shafts: the back- side of the shaft should be rounded to a radius of approximately ¾” (19mm.) near the oarlock area. Make sure a flat area remains to marry the oarlock. Diminish the radius going further down the shaft. A half-inch radius is adequate on the front. This shaping can be done by combination of plane and sanding. Make sure the rounding allows the oar to rotate in the oarlock with about 1/8” to spare.(NB. Do not round the last 8”(20cm.) of the back of the shaft where the blade is to be attached)
- The handle can be cut with a handsaw or careful application of circular and hand saw. Finish off with sanding disk and hand sanding. It is best made 5” (150mm) long, 1 1/8” (28mm) where it meets the shaft and 1 ½”(37mm) at the end of the oar. Reduce the dimensions for smaller hands.
- Apply a layer of fibreglass around the oarlock area for the Gaco and attach ¾” wedges front and back as an oar stop
- The blade: Can be home made or bought (Gaco is one source). It is best attached to the back of the shaft with one screw and epoxy bog. Now knock the blade into alignment and allow the glue to set.
- Fill in around the shaft attachment with epoxy and micro balloons and fibreglass over this.
- Finish by filling, sanding, and painting. Ordinary enamels and undercoats are adequate, but two part polyurethane is better.
My short career as a paint chemist indicated that epoxy should not be used as a varnish because of its poor UV resistance. Ignorant of this, some of the locals have been successfully priming with epoxy. I have followed suit, thinning a little with acetone if necessary. It seems to stiffen and harden the oar. I have to presume that the subsequent coats of varnish with their included UV inhibitors have obviated the problem of solar degradation.

Final tweaking:
The Gaco oarlock can be matched to the oar using a round backed rasp. Merely sharpen the internal radius in the plastic oar holding body to fit any discrepancy. Rub candlewax onto the oar where it meets the oarlock to facilitate feathering. Also make sure your oarlock sockets are high enough so that the blade is at the surface when you are pulling the oar at chest level.
An appreciation of the finer points of rowing combined with refined rowing equipment yields a satisfying and healthy experience. The rowing stroke can be savoured, unimpeded by clumsy and inefficient rowing gear. This will encourage a more constant use of an exercise yielding healthy mind and body. We might call it Zen and the art of row boating.